While I was in between hunts this past weekend I started this thread..... Please add to the discussion.
We’re a month plus into using the DNT Zulus optic and from what I'm experiencing and the feedback I'm getting, I think it would be a good idea to capture Tips, Tricks and Lessons Learned for our crossbow setup.
Let me start with a few.
Initial Setup - Tip
Read the manual first. Several guys have suggested printing it as the small manual can be hard to read.
The DNT Application is another thing to get familiar with. It's a good way to do the scope setup and save all the information needed to populate the core ballistic data: Zero distance, Scope height, Velocity (arrow speed), Caliber (arrow diameter), Weight and Ballistic Coefficient (BC).
Which Zulus Model To Buy - Tip
The ZHD312R is the Zulus that has HD recording, the 3-12X magnification and the LRF (LaserRangeFinder). LRF is key to auto ranging. The 3-12X mag. fits well for our short-range hunting and target practice needs. If you want to stretch that or have an application for a rifle the ZDH520R will provide 5-20X magnification.
DNT Technical Support - Tip
Make contact with Brawler1588 for DNT tech support. He's a good guy to work with.
Scope Mount - Tip & Trick
In most cases the standard 0 MOA mount is working well and sets the scope position so you have reasonable distance range, and your reticle is in a good, centered position on the viewing screen. Slight up or down adjustments to MOA can easily be made by inserting shims at the rear (more MOA) or front (less MOA) which will move the reticle position during the Zero process.
I needed to move my reticle up on the Wrath setup which is adding MOA. I did that with a small aluminum spacer/ shim between the 2 rear mounting screws. I made that shim from aluminum taken from a soft drink can. It’s simply a piece of the can cut with a scissors into a square sized to fit down in this channel which slightly raised the rear of the scope. You can layer the aluminum by folding it to make it the thickness needed. This is a small tuning Trick and for all of the detail fanatics in the room, it’s a simple step to get your reticle positioned perfectly.
7/24/25 Update - We continue to learn about the Zulus V1 & V2 setups and as noted above the 0MOA scope mount will work. As shooters are stretching out the distances target shooting, its evident that more angle will help achieve maximum distance potential. I've been using the 20 MOA mount and it's added angle helps keep my vertical image position in a reasonable spot. When you zero and adjust the X and Y positions it easy to get too negative vertically. If you have a 0 MOA scope mount and your Y position is -150 or more you should consider getting the 20 MOA mount or shimming the 0 MOA.
Ballistic Coefficient - Best Practices
.03 to .08 is the range working well for xbow shooting 370 to 500 fps. Speeds above 400 are .04 and up.
G1 is the Drag Function commonly used but I prefer G7 as it’s more precise at longer distances and better suited for guys shooting long range (70+ yards).
IR Module - Tip
The night mode in this scope uses illumination that is not visible to warm blooded animals but can be picked by the Starvis 2 video sensor that is the core video/image component that makes this optic tick. The scope comes with an 850 nm module. This is the IR module with the highest level of illumination, and it also has the brightest emitter. That emitter is a visible part of the torch. I prefer a lower brightness module which has a less visible emitter. That 940 nm modules emitter (red light) is not visible at about 20 yards, which is a pretty common distance bowhunters take varmints and hogs on night hunts. The 940 nm module tests well to provide illumination out to 100 yards.
IR Torch Type - Tip
This setting in the Feature section is “IR_V 850nm” for the 850 and 940 nm module.
Video Standby Recording - Trick
You can minimize button pressing to start video recording. This is especially valuable in a hunting situation where time can be critical. If you put the scope in Standby mode with recording On. This is especially valuable when hunting to be as ready as possible when you have an unexpected encounter with game and need to make a quick shot. Pressing the power button will take you off Standby and automatically restart video recording.
Eye Piece Option - Tip
The OE works fine but if you prefer one that folds and covers the ocular lens like the one used on the objective lens, there are two that I have tested and will work. The Vortex Defender O-32 is a loose fit but with a few rounds of electrical tape it fits well. It's a bit pricey at $25 but it's also very well built and opens and closes quietly. I also purchased the Shooney's Defender Flip Cap Object Flip-up Rifle Scope Lens Cover in the 35mm size which fit perfectly. Cost is only $7.90 but it's a bit noisy opening and closing making a snap sound.
Ballistics Not Working - Lessons Learned
Go into the Menu list, select "Ballistic Options" and verify the first option Ballistic Calculation is selected (in light green). If that is not selected the program will not work.
Ballistic Elements to Populate - Lessons Learned
There are five that need to be set:
Zero Distance - The distance in Yardage to zero. I'd suggest 20 or 30 yards.
Scope Height - The measurement in inches from the Arrow center to the Objective lens center.
Velocity - This is the actual arrow speed in FPS.
Caliber - This is the arrow shaft diameter in inches.
Weight - This is the total arrow weight in grains.
BC (Ballistic Coefficient and Drag Function) - The Ballistic Coefficient that will work best falls into the 0.020 to 0.080 range. I use 0.040 for my Wrath 430, 0.050 for my TX 440. Use G7 as the Drag function for both.
The other elements of the ballistic table can be left at the standard/default value.
That's a good start......
New Post - 11/26/24
How to move from Day Mode to Night Mode - Tip
The scope stays in Day Mode unless you change it to Night Mode.
That's done buy long pressing the IR Mode button (left center button, #15).
View attachment 316753
What's not the clearest in the manual is they refer to "Day Mode" as "Color Mode" and "Night Mode" as "Black/White Mode".
View attachment 316754
OK, here's how you do it:
New Post - 12/08/24
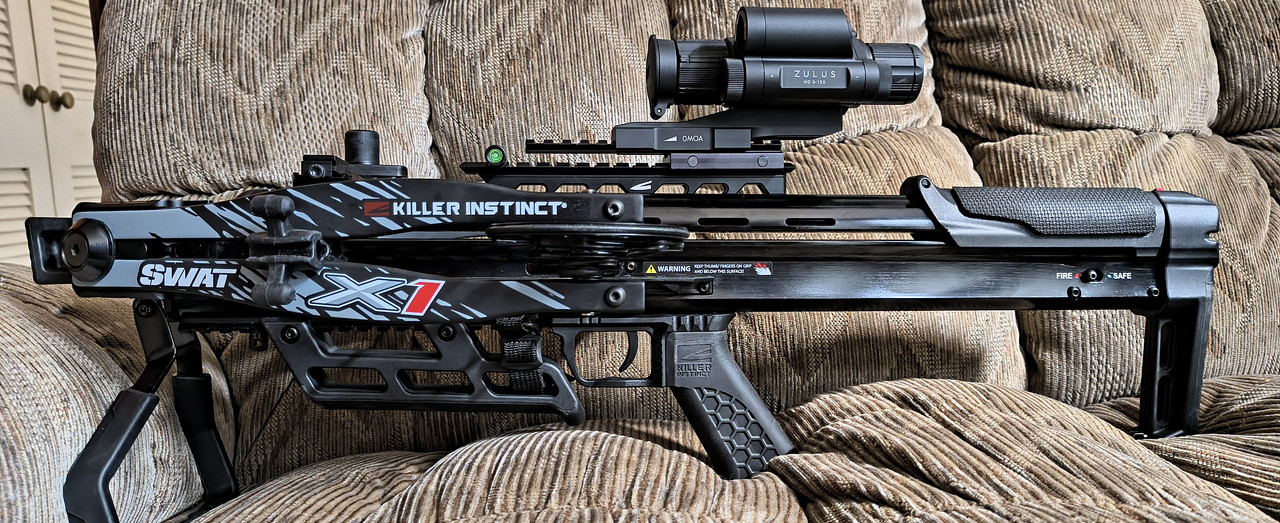
Buttons - Tip
![Image]()
Scope Focus/Adjustment Planning Is Important - Lesson Learned
I'm just back from a hunt in Missouri where I ran into Mother Nature at her finest. I planned for 0-3" of snow and temps in the 20s and got 6+" and two mornings that started in the teens. It was cold....
One of the wonderful attributes of this Zulus scope is its size. My plan for Day 1 of the hunt (the coldest day) was to use the hot hands "mittens" with fingers. A good plan to keep my hands warm and have fingers available for moving the crossbow, shooting and button pressing when needed. What I didn't consider was what was needed to focus the optic after initial setup. I typically set the focus at a selected yardage where I think I may have a shooting or video opportunity and then adjust as needed. Day one brought a buck encounter that was 30-40 yards further than expected and turkeys 10-20 yards past the initial focus.
Turkeys - Focused Too Close
This video is still OK, but it could have been much clearer with a slight change in focus. At 8:30 I was hunkered down and a little cold. If I would have had warm fingers in a full fingered glove, I would have taken the time to adjust focus. Ya, poor excuse....
First Buck - Focused Too Close
The same holds here.
Sunny Morning Buck - Good Focus
Day 2 was better. I did have more time to adjust the camera focus and was wearing more appropriate gloves to do it.
What I take away is I need to think through cold weather hunting plans with all my gear in mind. Thanks goodness I brough all I needed to stay warm and operate the gear so the afternoon hunt and following hunts went better. The HotHands mittens will not be part of my future cold weather hand gear.
New Post - 12/28/24
Battery Charger Adjustment - Tip
The DNT supplied dual battery charger has 3 charging options: .5 amp, 1 amp and 2 amp settings. My charger was set to .5 amp.
New Post - 5/6/25
Video Tech Resource - Tip
There is more here than info. on just the Zulus but good stuff for anyone doing setup.
DNT Tech On YouTube
New Post - 5/24/25
Loop Recording - Tip
There are 4 options for the amount of time that a recording can set run time to: 1, 3 and 5 minutes and OFF. If you choose OFF, it will run to 10 minutes then loop. This can be set in the Main Menu under the Loop Recording entry. If you happen to be recording with Loop set at 1 minute and have an event and run past that time, the optic will immediately automatically start another video session.
New Post - 6/7/25
Using the LRF
I've been asked this a number of times so let me share my thoughts and use practices in hunting situations. Keep in mind I'm not a stalker so my POV comes from a ground blind, or elevated ladder stand or climber experience.
My Process:
1. ID and range potential targets prior to a game encounter. This gives you a distance reference for a hold-over shot if something happens and you can't range with the LRF.
2. Leave the scopes range locked onto the most likely range for a shot. When you first turn on the Zulus and have not ranges anything it defaults the reticle to whatever your zero range is.
3. As you see an animal you have to determine if it is going to be in range, stopping (feeding) or will stop if you grunt at him. If he will stop, you can range him (short press twice) vs estimating hold-over base on your original locked in range.
4. The scope will scan distance with a single LRF button press. After it's locked or just turned on, one short press of the range button will activate the LRF and start scanning. The digital distance readout will show top center, it will scan and continue to scan until you press the button a second time and lock in the distance. If you have time with an animal coming by slowly, press the button one time and let it scan until your target has stopped or you stop it. Press the button the second time and lock it and take the shoot.
Arm movement to the LRF can be kept hidden. Practice that movement keeping your hand and arm relatively close to your body so when you raise it, movement can be hidden from the animals POV.
Each situation has variables, but the LRF ranging is not tough to learn as you practice, hunt with it and use it.
Another "TIP" that I think is important to understand is having Recording "ready" when you're hunting. To turn it on normally it's a button press and that could happen at an inopportune time. I typically have my scope in Standby when siting to preserve battery. Before going into Standy I also turn on recording prior to short pressing the power button to put it in Standby. That locks in the Recoding mode so when you press the power button to wake up the scope, Recoding is already on and you don't have to look for a button to press and start it. Very handy when you spot a deer and want to get into shooting position. One less button press wakes it up and one less press to think about in the heat of the moment.
New Post - 07/12/25
Fine Tuning LRF Position
The final position of the LRF marker is impacted by several things, most significantly where the scope reticle position ends up after zeroing. If the location is too far off the reticle you might consider this approach.
Move the laser marker up......
If you have a "0" MOA base, you can move it up by going to a 20 or 35MOA base. A 20 MOA should work well for most crossbows and using the most suitable MOA base is the BEST option. If for some reason that's not an option, you can shim the existing base and add more MOA. I'd suggest adding that shim between the last two holes in the mount. What is pictured below is the 20 MOA mount I have on my setup but I'll use it in these pictures for the shimming reference.

I use soft drink can for the aluminum strip. A 5/16" strip cut with a common household scissors, then cut again to 1" length, folded in half twice (flatted with a hammer) and you will have about .015-.020 shim. That's a good starting point for an elevation change.

After installing this shim you will need to go through the zero process again. POI will have changed so check at 10 or 20 yards then your zero yardage if it's more than 20.

Move the laser marker left or right.....
You have to turn the optic slightly to accomplish this. How to do that is the same approach as above: add a shim.
The DNT Scope base is long enough to safely accommodate this small shim. I'm sure the engineers at DNT would cringe at this approach as it opens the possibilities of mistakes and issues associated. Ya, were a rebel group here on CBN and like what we like to make our gear better so until there's an adjustable LRF, this is a simple approach that will work just fine if done well.
It seems from my experience that moving the laser to the right is the most common. I make a shim in the same manner as earlier noted and fold it so it "V" shaped, then add it between the edge of the scope rail and the scope. The size of the shim is a bit smaller than the base spacer, about 3/16" square and folded into a "V" shape that fits your scope rail edge.


You will need to ID where the shim will go and possibly use a light adhesive to hold it in place while you mount the scope. I've also successfully slid these in place with the help of a long shim holder. I made that holder from a 10"L X 1/8"W round wooded stick. I split the end of the stick and slid the back edge of the spacer inside that and slipped it in between the mount base and the pic rail. Be VERY careful to visually confirm the ship position is when you want it. Just another approach to shim placement.
When the shim is in place correctly it pitches the scop base outward and points the front of the Zulus to the right and in turn the LRF as well.

You may have to experiment with how many layers of aluminum it will take to move it where you prefer.

We’re a month plus into using the DNT Zulus optic and from what I'm experiencing and the feedback I'm getting, I think it would be a good idea to capture Tips, Tricks and Lessons Learned for our crossbow setup.
Let me start with a few.
Initial Setup - Tip
Read the manual first. Several guys have suggested printing it as the small manual can be hard to read.
The DNT Application is another thing to get familiar with. It's a good way to do the scope setup and save all the information needed to populate the core ballistic data: Zero distance, Scope height, Velocity (arrow speed), Caliber (arrow diameter), Weight and Ballistic Coefficient (BC).
Which Zulus Model To Buy - Tip
The ZHD312R is the Zulus that has HD recording, the 3-12X magnification and the LRF (LaserRangeFinder). LRF is key to auto ranging. The 3-12X mag. fits well for our short-range hunting and target practice needs. If you want to stretch that or have an application for a rifle the ZDH520R will provide 5-20X magnification.
DNT Technical Support - Tip
Make contact with Brawler1588 for DNT tech support. He's a good guy to work with.
Scope Mount - Tip & Trick
In most cases the standard 0 MOA mount is working well and sets the scope position so you have reasonable distance range, and your reticle is in a good, centered position on the viewing screen. Slight up or down adjustments to MOA can easily be made by inserting shims at the rear (more MOA) or front (less MOA) which will move the reticle position during the Zero process.
I needed to move my reticle up on the Wrath setup which is adding MOA. I did that with a small aluminum spacer/ shim between the 2 rear mounting screws. I made that shim from aluminum taken from a soft drink can. It’s simply a piece of the can cut with a scissors into a square sized to fit down in this channel which slightly raised the rear of the scope. You can layer the aluminum by folding it to make it the thickness needed. This is a small tuning Trick and for all of the detail fanatics in the room, it’s a simple step to get your reticle positioned perfectly.
7/24/25 Update - We continue to learn about the Zulus V1 & V2 setups and as noted above the 0MOA scope mount will work. As shooters are stretching out the distances target shooting, its evident that more angle will help achieve maximum distance potential. I've been using the 20 MOA mount and it's added angle helps keep my vertical image position in a reasonable spot. When you zero and adjust the X and Y positions it easy to get too negative vertically. If you have a 0 MOA scope mount and your Y position is -150 or more you should consider getting the 20 MOA mount or shimming the 0 MOA.
Ballistic Coefficient - Best Practices
.03 to .08 is the range working well for xbow shooting 370 to 500 fps. Speeds above 400 are .04 and up.
G1 is the Drag Function commonly used but I prefer G7 as it’s more precise at longer distances and better suited for guys shooting long range (70+ yards).
IR Module - Tip
The night mode in this scope uses illumination that is not visible to warm blooded animals but can be picked by the Starvis 2 video sensor that is the core video/image component that makes this optic tick. The scope comes with an 850 nm module. This is the IR module with the highest level of illumination, and it also has the brightest emitter. That emitter is a visible part of the torch. I prefer a lower brightness module which has a less visible emitter. That 940 nm modules emitter (red light) is not visible at about 20 yards, which is a pretty common distance bowhunters take varmints and hogs on night hunts. The 940 nm module tests well to provide illumination out to 100 yards.
IR Torch Type - Tip
This setting in the Feature section is “IR_V 850nm” for the 850 and 940 nm module.
Video Standby Recording - Trick
You can minimize button pressing to start video recording. This is especially valuable in a hunting situation where time can be critical. If you put the scope in Standby mode with recording On. This is especially valuable when hunting to be as ready as possible when you have an unexpected encounter with game and need to make a quick shot. Pressing the power button will take you off Standby and automatically restart video recording.
Eye Piece Option - Tip
The OE works fine but if you prefer one that folds and covers the ocular lens like the one used on the objective lens, there are two that I have tested and will work. The Vortex Defender O-32 is a loose fit but with a few rounds of electrical tape it fits well. It's a bit pricey at $25 but it's also very well built and opens and closes quietly. I also purchased the Shooney's Defender Flip Cap Object Flip-up Rifle Scope Lens Cover in the 35mm size which fit perfectly. Cost is only $7.90 but it's a bit noisy opening and closing making a snap sound.
Ballistics Not Working - Lessons Learned
Go into the Menu list, select "Ballistic Options" and verify the first option Ballistic Calculation is selected (in light green). If that is not selected the program will not work.
Ballistic Elements to Populate - Lessons Learned
There are five that need to be set:
Zero Distance - The distance in Yardage to zero. I'd suggest 20 or 30 yards.
Scope Height - The measurement in inches from the Arrow center to the Objective lens center.
Velocity - This is the actual arrow speed in FPS.
Caliber - This is the arrow shaft diameter in inches.
Weight - This is the total arrow weight in grains.
BC (Ballistic Coefficient and Drag Function) - The Ballistic Coefficient that will work best falls into the 0.020 to 0.080 range. I use 0.040 for my Wrath 430, 0.050 for my TX 440. Use G7 as the Drag function for both.
The other elements of the ballistic table can be left at the standard/default value.
That's a good start......
New Post - 11/26/24
How to move from Day Mode to Night Mode - Tip
The scope stays in Day Mode unless you change it to Night Mode.
That's done buy long pressing the IR Mode button (left center button, #15).
View attachment 316753
What's not the clearest in the manual is they refer to "Day Mode" as "Color Mode" and "Night Mode" as "Black/White Mode".
View attachment 316754
OK, here's how you do it:
- The first Long Press changes it from Day Mode to Night Mode.
- A second Short Press turns the IR lamp on (the red emitter is now on). While you are in the Night Mode with the IR lamp "on" you can toggle the IR Lamp brightness by short pressing the same #15 button. Watch the top widgets on the screen while you do this and you will see the IR Lamp indicator bars step from low to high, then AUTO and then back to low. The brightness changes you see will be obvious.
- Now the third Long Press will take you back to Day Mode and shut off the IR Lamp.
New Post - 12/08/24
Buttons - Tip
Scope Focus/Adjustment Planning Is Important - Lesson Learned
I'm just back from a hunt in Missouri where I ran into Mother Nature at her finest. I planned for 0-3" of snow and temps in the 20s and got 6+" and two mornings that started in the teens. It was cold....
One of the wonderful attributes of this Zulus scope is its size. My plan for Day 1 of the hunt (the coldest day) was to use the hot hands "mittens" with fingers. A good plan to keep my hands warm and have fingers available for moving the crossbow, shooting and button pressing when needed. What I didn't consider was what was needed to focus the optic after initial setup. I typically set the focus at a selected yardage where I think I may have a shooting or video opportunity and then adjust as needed. Day one brought a buck encounter that was 30-40 yards further than expected and turkeys 10-20 yards past the initial focus.
Turkeys - Focused Too Close
First Buck - Focused Too Close
Sunny Morning Buck - Good Focus
What I take away is I need to think through cold weather hunting plans with all my gear in mind. Thanks goodness I brough all I needed to stay warm and operate the gear so the afternoon hunt and following hunts went better. The HotHands mittens will not be part of my future cold weather hand gear.
New Post - 12/28/24
Battery Charger Adjustment - Tip
The DNT supplied dual battery charger has 3 charging options: .5 amp, 1 amp and 2 amp settings. My charger was set to .5 amp.
New Post - 5/6/25
Video Tech Resource - Tip
There is more here than info. on just the Zulus but good stuff for anyone doing setup.
DNT Tech On YouTube
New Post - 5/24/25
Loop Recording - Tip
There are 4 options for the amount of time that a recording can set run time to: 1, 3 and 5 minutes and OFF. If you choose OFF, it will run to 10 minutes then loop. This can be set in the Main Menu under the Loop Recording entry. If you happen to be recording with Loop set at 1 minute and have an event and run past that time, the optic will immediately automatically start another video session.
New Post - 6/7/25
Using the LRF
I've been asked this a number of times so let me share my thoughts and use practices in hunting situations. Keep in mind I'm not a stalker so my POV comes from a ground blind, or elevated ladder stand or climber experience.
My Process:
1. ID and range potential targets prior to a game encounter. This gives you a distance reference for a hold-over shot if something happens and you can't range with the LRF.
2. Leave the scopes range locked onto the most likely range for a shot. When you first turn on the Zulus and have not ranges anything it defaults the reticle to whatever your zero range is.
3. As you see an animal you have to determine if it is going to be in range, stopping (feeding) or will stop if you grunt at him. If he will stop, you can range him (short press twice) vs estimating hold-over base on your original locked in range.
4. The scope will scan distance with a single LRF button press. After it's locked or just turned on, one short press of the range button will activate the LRF and start scanning. The digital distance readout will show top center, it will scan and continue to scan until you press the button a second time and lock in the distance. If you have time with an animal coming by slowly, press the button one time and let it scan until your target has stopped or you stop it. Press the button the second time and lock it and take the shoot.
Arm movement to the LRF can be kept hidden. Practice that movement keeping your hand and arm relatively close to your body so when you raise it, movement can be hidden from the animals POV.
Each situation has variables, but the LRF ranging is not tough to learn as you practice, hunt with it and use it.
Another "TIP" that I think is important to understand is having Recording "ready" when you're hunting. To turn it on normally it's a button press and that could happen at an inopportune time. I typically have my scope in Standby when siting to preserve battery. Before going into Standy I also turn on recording prior to short pressing the power button to put it in Standby. That locks in the Recoding mode so when you press the power button to wake up the scope, Recoding is already on and you don't have to look for a button to press and start it. Very handy when you spot a deer and want to get into shooting position. One less button press wakes it up and one less press to think about in the heat of the moment.
New Post - 07/12/25
Fine Tuning LRF Position
The final position of the LRF marker is impacted by several things, most significantly where the scope reticle position ends up after zeroing. If the location is too far off the reticle you might consider this approach.
Move the laser marker up......
If you have a "0" MOA base, you can move it up by going to a 20 or 35MOA base. A 20 MOA should work well for most crossbows and using the most suitable MOA base is the BEST option. If for some reason that's not an option, you can shim the existing base and add more MOA. I'd suggest adding that shim between the last two holes in the mount. What is pictured below is the 20 MOA mount I have on my setup but I'll use it in these pictures for the shimming reference.
I use soft drink can for the aluminum strip. A 5/16" strip cut with a common household scissors, then cut again to 1" length, folded in half twice (flatted with a hammer) and you will have about .015-.020 shim. That's a good starting point for an elevation change.
After installing this shim you will need to go through the zero process again. POI will have changed so check at 10 or 20 yards then your zero yardage if it's more than 20.
Move the laser marker left or right.....
You have to turn the optic slightly to accomplish this. How to do that is the same approach as above: add a shim.
The DNT Scope base is long enough to safely accommodate this small shim. I'm sure the engineers at DNT would cringe at this approach as it opens the possibilities of mistakes and issues associated. Ya, were a rebel group here on CBN and like what we like to make our gear better so until there's an adjustable LRF, this is a simple approach that will work just fine if done well.
It seems from my experience that moving the laser to the right is the most common. I make a shim in the same manner as earlier noted and fold it so it "V" shaped, then add it between the edge of the scope rail and the scope. The size of the shim is a bit smaller than the base spacer, about 3/16" square and folded into a "V" shape that fits your scope rail edge.
You will need to ID where the shim will go and possibly use a light adhesive to hold it in place while you mount the scope. I've also successfully slid these in place with the help of a long shim holder. I made that holder from a 10"L X 1/8"W round wooded stick. I split the end of the stick and slid the back edge of the spacer inside that and slipped it in between the mount base and the pic rail. Be VERY careful to visually confirm the ship position is when you want it. Just another approach to shim placement.
When the shim is in place correctly it pitches the scop base outward and points the front of the Zulus to the right and in turn the LRF as well.
You may have to experiment with how many layers of aluminum it will take to move it where you prefer.
- A rear left side shim or front right side shim will move the laser from left to right toward the center of the reticle.
- A rear right side shim or front left side shim will move the laser from right to left toward the center of the reticle.