Crossbow Nation banner

Barnett G350C

1 reading
6.5K views 23 replies 7 participants last post by  ko4nrbs  
#1 ·
New to the Xbox family
My concern is on my g350c the bolt to rail clearance as the forward end of the bolt does not lay flat on the rail 1/8 -3/16 clearance
An the string lays heavy on the rail
After several shots it may shot 2-3 bolts straight an true the the next shot may be form 2-3 in off high low or left to right
Note I’m shooting with the Xbow in a gun vice
 
#3 ·
New to the Xbox family
My concern is on my g350c the bolt to rail clearance as the forward end of the bolt does not lay flat on the rail 1/8 -3/16 clearance
An the string lays heavy on the rail
After several shots it may shot 2-3 bolts straight an true the the next shot may be form 2-3 in off high low or left to right
Note I’m shooting with the Xbow in a gun vice
In the uncocked position look from one cam to the other along the bow string. Does the bow string hump up as it crosses the rail-stock? If it does, this is a common problem with many Barnett crossbows. To correct that, one requires shims in the upper area between the riser and where it meets the rail-stock. This will eliminate the excessive downward pressure on the bow string. Once set up, the bow string should have a credit card thickness clearance to just lightly touching the rail-stock when the crossbow is in the uncocked position. This adjustment greatly reduces serving wear in the arrow nock-latch area.

As your crossbow is now, the bow string does not center properly in the 1/2 moon nock and this puts extra downward pressure on the rear of the arrow. A lighter arrow-point combination will lift at the front end. The excessive downward pressure at the nock end will cause wear marks in the nock where it rides the rail. These will eventually move up into the arrow shaft.

In the uncocked position, mark the bowstring on each outer edge of the rail-stock with white out. One uses these marks as a reference when cocking the crossbow with a rope cocker. Sometimes as one nears the fully cocked position, one may pull a bit more on one side which off sets the center of the bow string causing the arrow to miss the point of aim.

With the scope removed and the crossbow blocked level, put a level on the picatinny rail parallel to the rail-stock. If the picatinny rail does not match the reading when the level was on the rail-stock, the picatinny rail will need leveling by adding a shim below it.

Recheck the screws that hold the picatinny rail to the crossbow and the cross bolts that hold the scope to the picatinny rail and the scope ring screws. Any slight movement will effect how you view your aiming point as compared to where the arrow hits the target. Hang a weight on a string 10 yards or so from the front of the crossbow. Does the vertical line of the scope match this? If not loosen the scope rings a bit and rotate the scope.

Barnett scopes are not very good quality, so for a trial install another scope (rifle scope etc.).

In the uncocked position check your crossbow cam timing by looking down from above where a cable crosses the cam. If the crossbow is in time the other cam should reference the same. You can check the timing in the cocked position. If the cams are in time these reference points should match but will show a different area as compared to the uncocked position. To make a correction, add 1/2 or full twists to the single loop end of the cable that fastens onto the lobe of the cam.

To increase speed or to bring the crossbow up to the advertised speed, taking into consideration if an over weight arrow-point combination is used, add equal 1/2 or full twists to the single loop end of the cables that go on to the lobe of the cam. For every ten grains over the advertised arrow-point weight combination the manufacture used to obtain their advertised speed, one will lose approximately 3 feet per second.

Cam leveling: in the cocked position, block the crossbow level. Lay a level across the rail-stock and 90 degrees to it. Now lay the level on each cam, 90 degrees to the rail-stock. If the cams are level, these readings should match. If a cam tilts upward, add 1/2 or full twists to the upper "Y" section of the cable. If the cam tilts down add 1/2 or full twists to the lower "Y" section of the cable. Recheck the cam timing.

Note: to make any adjustment, the crossbow has to be put in a press.

All the best.
 
#5 ·
I’ve read about the shim jobs but I don’t fully understand how this would work
Also I took some pictures an trying to figure out how to post
To install the shims, one backs the riser bolt out a bit, builds the shims just thick enough that when the riser is fully tightened this angles the stirrup end of the riser downward which tilts the cam limbs up to eliminate the downward bow string pressure. Two identical crossbows may require different shim thicknesses. due to the way the crossbow was manufactured.
For a trial and error, I just cut a 1/4" wide strip of card board from a cereal box or shoe box and kept folding it over until I achieve the right thickness. Measure that thickness, then build two identical pieces, one for each side of the rail-stock. Have the top flush and flush with the groove of the rail-stock so as not to catch the arrow.

All the best.
 
#6 ·
You would think Barnett would do something about this problem
I know the local archery shop said they will sell the Barnett’s they have in stock but will not stock any more
Is there anything to be done to the bolt to rail lack of contact
Thanks for your reply an input bunnyrabbit
I would like to get the Barnett to shoot right
I really like what I’ve read about the new Bear Xbows but I have to have something with a crank cocking ability
Leaning toward a Ten Point if the bear intense doesn’t fit the bill
 
#7 ·
You would think Barnett would do something about this problem
I know the local archery shop said they will sell the Barnett’s they have in stock but will not stock any more
Is there anything to be done to the bolt to rail lack of contact
Thanks for your reply an input bunnyrabbit
I would like to get the Barnett to shoot right
I really like what I’ve read about the new Bear Xbows but I have to have something with a crank cocking ability
Leaning toward a Ten Point if the bear intense doesn’t fit the bill

Once the proper thickness of shims are installed, just tighten the riser bolt up as one normally would. Then recheck to
make sure the shims do not stick up above the riser or in toward the arrow groove. Some shims may be 1/8", 1/16" thick while others can be less depending on the crossbow.

Barnett's problem is they will not acknowledge their problem, but instead make out it is normal. This is what happens when various companies build items that are for another company. Nobody seems to work together to make sure things
work properly.
I have ran into similar situations when using trail cameras. One company builds the camera which is high quality. Another company builds the software to operate the camera, but the consumer is the one stuck to see if it performs correctly. Going one step farther, if a dealer imports the camera, there is no way for the consumer to contact the original manufacture to explain where the problem is to help remedy this situation in future builds.
All the best.
 
#9 ·
Working on the Barnett g350c this morning found the scope rail isn’t level with the rail started to remove the p rail to shim to level an to get to the tooth brush to trim it or relieve some pressure as it extends below the center of the half moon knock but not having any luck getting the p rail off lose in the rear but stuck in the front any help would be appreciated
 
#10 ·
When you went to install an arrow, was it hard to install? Normally the arrow should be easy to install and easy to remove if the brush holder is functioning properly. The brush should easily retract 1/16 of an inch. Looking at the brush from the side there should be a space between the bottom of the brush and the top of the rail-stock.

I will give the instructions as if the scope was still mounted, some of which you may have already done. If you are not sure, make notes and take pictures.

1)remove the scope making a notation what slots the cross bolts were in.
2)at the back of the housing that the picatinny rail fastens to, remove the allen head bolt.
3)remove the two counter sunk screws that hold the picatinny rail to the housing as these fasten the housing to the top of the trigger box.
4)remove the picatinny rail and housing as a unit.
5)flip the picatinny rail-housing over and remove the screw behind the brush.
6)put your thumb on the brush and press it to see if you can feel upward movement. If you can the brush is functioning properly. If not the brush holder may have been installed 1/2 way around.
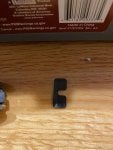
7)with the brush facing upward you will notice that small section curves down ward, toward the picatinny rail. At the front of this small section is a groove. Insert a flat screw driver and while carefully pushing it in, push the brush holder assembly forward. The screw driver unlocks this small section (brush holder assembly).
8)with the brush holder assembly removed, you will see another small screw going up through the main housing into the picatinny rail. Remove this screw and the picatinny rail will come off. This is where you put the required shim with that screw going up through it. The screw holds the shim in place. Depending on the thickness of the shim, a longer screw may be required. If so make sure it does not stick above the top of the picatinny rail.
9)leave the brush holder out for now until you get the proper shim thickness as the housing and picatinny rail may have to be re installed a few times.
10)when you remove the brush, you will see a flat curved spring with a hook on one end. As the brush is retracted when an arrow is loaded, this spring flattens out a bit. After the arrow is shot the spring pushes the brush back down to its normal position.
11)the brush holder only fits one way in the housing as there is a small groove for a projection to fit into. If the brush holder was installed that 1/2 turn out or not seated properly, the brush will not retract properly.
12)just reassemble everything.
Note: do not cut the brush.
Here are some pictures showing where to put the screw driver and the flat curved spring in the brush holder.


I took my 2018 Barnett Drop Tine STR a part so I could give you these instruction. I had a Barnett Whitetail Hunter Pro STR that had the same problem.

All the best.
 
#11 ·
First off thanks bunnyrabbit for your quick response an instructions
Now I was able to get the scope p rail level to the bolt rail best guess it took around a 1/16 shim to level it out
The brush was hard to push a bolt into an would push down on the fletching an deformed them I cut it down a lot it will still hold the bolt in place even when it’s pointed to the ground an doesn’t push on the fletching
Then I moved to shim the rail to get some pressure of the string to rail I’m going to say it took 1/4-5/16 shims to get the string to it barely rode on the rail
But I will need to get back to the shop to manufacture a proper tapered shim as the stacked shims I made to see how much I needed blew out under the pressure
Long story short once this is completed an if it shoots proper I will either keep it for back up or pass it off for a deal as of now I’m headed to the archery shop to shoot a couple of Xbows at their indoor range
 
#14 ·
My crossbows are set up in high quality rifle jigs with level bubbles on the jig, in the hollow of the stirrup (depending on the model of crossbow) and an off set bubble on the scope. I use the crank system, as I do not have to remove the crossbow, cock it then reset it in the jig. My crossbows are used for target shooting.

For those with the shim modification and using the rope cocker, this will pull straight back, further reducing serving wear which Barnett's lower crank system causes.

For arrows, I shoot 20" Barnett Custom Head Hunters (no Easton label) and 20" Carbon Express Pile Driver. Both these arrows are very high quality with the Barnett Custom Head Hunter arrow-point combination averaging 410 grain and the Carbon Express Pile Driver arrow-point combination averaging 450 grain. Carbon Express Pile Driver arrows are manufactured in Korea. China is building similar arrows with the same name and design but 3 arrows that came with a crossbow were 7 grains difference from high to low, not counting the point weight.

At the time of purchase, Barnett were building their own arrows. Easton arrows built for Barnett were the same weight with one bow and the next bow of the same series, those arrows matched but did not match what came with the first bow. This is why I will not shoot any arrows Easton builds for crossbows.

For those using a rope cocker, in the uncocked position, mark the bow string on each side of the rail-stock with white out. The reason for this, as one nears the fully cocked position, sometimes one pulls more on one side, thus offsetting the center of the bowstring. Shooting this way, the arrow will miss the point of aim. When the crossbow is properly cocked the whiteout marks should be equal distance from the center of the rail-stock.

All the best.
 
#16 ·
If one is cocking with a rope, there is a possibility the crossbow is not cocked evenly. Marking the bowstring in the uncocked position on each side of the rail-stock with white out will quickly show this.

Providing the crossbow is cocked evenly, with a level bubble installed on the crossbow to show if one is tilting or canting the crossbow, the same arrow shot repeatedly should hit very close to the same point of impact even if it was not the point of aim.

From this point, one can shoot several marked arrows (numbered) to see the better groups. Just shoot each arrow single and record the area of impact. Shooting several with out removing them can result in damaged arrows.

This is where a good quality rifle rest comes in because once the crossbow is properly tuned and sighted in, any error is the shooter.

All the best.
 
#17 ·
Hey guys sorry for late response
1 cocking with Barnett crank
2 I have marked the bolts an have had mixed results shooting the same bolt
3 I did get the scope rail shimming completed it took almost a 1/16in shim on the forward part of the rail

As for the actual shimming of the bow part I’m away from my shop an can’t make a shim that I would trust to stay seated I’ve trued glueing it in let it sit for 24hrs with pressure on the mounting bolt but when I put the final torque on it the shim spits out the top planning on making a tapered shim that will fit over the mounting bolt then taper up to the top which I’ve seen it will be 5/16 thick
If this doesn’t work a new Xbow will be in the near future I know for reading the post all manufactures have their problems but the problems with this Barnett just seem to be over the top
Almost forgot to mention that I’m yawing a gun vice to try an take the human out of consideration
 
#20 ·
Greetings:
These pictures I am enclosing are from a Ghost 410 riser. This is the same riser your crossbow has as there are several series that the riser and 12 1/2" limbs are identical and will inter change.
The material I used is two pieces of 3/16" x 1/4" key stock, cut 1/2" long, filed to fit. No beveling is required. The key stock can be purchased at an automotive store or possibly a hard ware store.

If you look at the pictures of the riser, you will see a ridge near the top above the riser bolt hole (one on each side). This is where the shims fit. Once filed to the proper size, I used a dab of Gorilla glue to hold them to the riser, then firmly tightened the riser bolt as one normally would.


Pictures from left to right:
First: view of installed shim.
Second: riser, showing the ridge.
Third: riser, showing the ridge at a different angle view.
Fourth: diagram showing the cut key stock with the measurements.

Your crossbow may require the same thickness (3/16") or a bit less. Even identical crossbow series can vary. Assemble everything before applying the glue and check for the bow string to rail-stock downward pressure. If done properly the bowstring should lightly touch to a credit card thickness clearance.

When completed: 1)the top of the shim is flush with the top of the rail-stock, 2)the end of the shim is flush with the arrow groove in the rail-stock.

All the best.
 
#21 ·
Greetings:
These pictures I am enclosing are from a Ghost 410 riser. This is the same riser your crossbow has as there are several series that the riser and 12 1/2" limbs are identical and will inter change.
The material I used is two pieces of 3/16" x 1/4" key stock, cut 1/2" long, filed to fit. No beveling is required. The key stock can be purchased at an automotive store or possibly a hard ware store.

If you look at the pictures of the riser, you will see a ridge near the top above the riser bolt hole (one on each side). This is where the shims fit. Once filed to the proper size, I used a dab of Gorilla glue to hold them to the riser, then firmly tightened the riser bolt as one normally would.

View attachment 167738 View attachment 167740 View attachment 167742 View attachment 167744

Pictures from left to right:
First: view of installed shim.
Second: riser, showing the ridge.
Third: riser, showing the ridge at a different angle view.
Fourth: diagram showing the cut key stock with the measurements.

Your crossbow may require the same thickness (3/16") or a bit less. Even identical crossbow series can vary. Assemble everything before applying the glue and check for the bow string to rail-stock downward pressure. If done properly the bowstring should lightly touch to a credit card thickness clearance.

When completed: 1)the top of the shim is flush with the top of the rail-stock, 2)the end of the shim is flush with the arrow groove in the rail-stock.

All the best.
Thanks for the pictures
My only problem is that I’ve tried this type of shim but this Xbow needs 5/16 to 3/8 thick shims to get the string to where you are talking about
I shot it one time with the shims like you are showing only to have them pop out even with being gorilla glued in
Only difference in the shims were I made mine out of high impact polyurethane
Today the last day of our bow season I’m hoping to go to the bow shop next week an see if they discount any bows to make room for the new models for next year
I did remove the rail did some looking an measuring
I think I can move the top rail forward an machine some of the polyurethane pieces to take up the gap in the rear I will be trying this later on this year
I would like to thro a THANKS for all the information an advice given an will post the rest from moving the rail forward when I get it completed
 
#22 ·
Using material thicker than the width of the ridge that I showed in the picture of the riser may be one of the reasons the shims pop out. My other thought, that area has to to squeaky clean with no trace of wax or lubricant as Gorilla Glue will not stick. A bit too much Gorilla Glue and it does not cure properly.

Swapping to thinner axle shims may raise the cams up a bit, bit one has to watch not to come too close to the upper "Y" section of the cable when cocking and shooting the crossbow. This is where I was limited when cam leveling my 2018 Barnett drop Tine STR. To allow for more clearance is remove a bit of the serving at the cam end (Y section) of the cable.
The narrower axle to axle crossbows have a steeper cable angle in that area.

Check the riser over well with a bright light, as Barnett's risers in those series (Ghost 410, Buck Commander BCXtreme 365 Ultra Lite etc.) have shown hair line cracks which can get worse. I have found these hair line cracks on the left hand inner (shooter side) that appear as a manufacture flaw in the coating or dipping. These crossbows all use the same riser which are inter changeable. The Carbonite risers tend to crack from the inside out, then explode. If the riser explodes, then sometimes good by to the cam and limbs. Carbonite risers will not stand vibration.

All my crossbows are set up in high quality rifle jigs and cocked with the crank cocking system so there was no way that I twisted the riser stirrup when cocking. Cocking on uneven ground resulting in different foot pressure on the stirrup, I could see this happening over time.

The riser design was one of my preferences due to the neat design instead of the jut out stirrup like the older crossbows originally came out with. If the riser was built out of aluminum or some other high quality product, that would be a huge improvement. If you look at say a 2018 Barnett Drop Tine STR, there is a gusset in each of the large holes near the limb pocket end of the riser which help strengthen the riser.

As for having to go with thicker shims as you mention to relieve the downward bow string pressure all I can suggest is: dismantle the crossbow and check that the limbs are properly seating in the limb pockets, the limb rockers are properly seated and the limbs fit the limb rockers properly. If going this far, lube the limb pockets and limb rockers (both sides) with Lithium grease as this prevents squeaking when cocking and shooting the crossbow.

Barnett's newer crossbows with that riser style: 1)the limbs have been shortened from 12 1/2" to 11" and 2)measuring across the top center of the limb rockers, this has been narrowed as well as 3)adding the mentioned gusset in the riser holes. Doing this narrowing and limb shortening has reduced the speed in feet per second that the Ghost 410 and Buck Commander BCXtreme 365 Ultra Lite could accomplish. For long range target shooting, one wants a fast crossbow due to flatter arrow trajectory.

Wishing you all the best with what ever you decide.
 
#24 ·
GOOP may work better to keep the shims in. It's more elastic than Gorilla Glue and can be peeled off if you need to remove it. I used it to glue the rubber pads back the the Dissapator Bars on my Excalibur Exomax crossbow and it worked well. These rubber pads are the sting stops and take a tremendous beating not to mention very significant vibration.
Bill
Image